Introduction to Chromebooks and Screenshotting
Welcome to the world of Chromebooks, where sleek design meets effortless functionality. If you’ve ever wondered how to capture and share what’s on your screen with just a few clicks, you’re in the right place! Screenshotting on a Chromebook is quick and easy once you know how. So, let’s dive into the different methods and tips for mastering this essential skill! Also, Click
The Different Methods of Taking Screenshots on a Chromebook
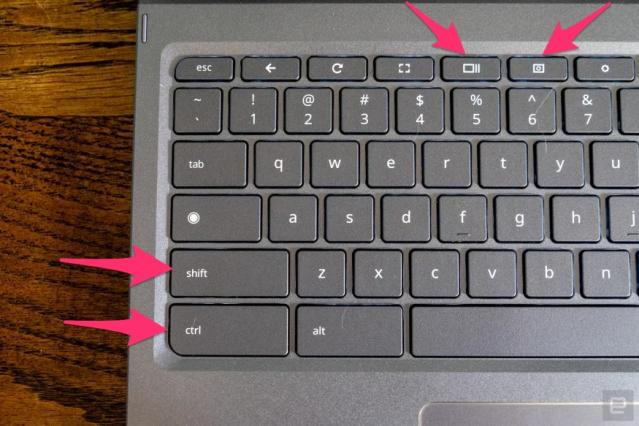
Chromebooks offer various methods for capturing screenshots, making it easy to save and share important information with just a few clicks. One way to take a screenshot on a Chromebook is by using keyboard shortcuts. By pressing the “Ctrl” and “Switch window” keys simultaneously, you can capture the entire screen or use “Ctrl + Shift + Switch window” to select a specific area.
Another method for taking screenshots on a Chromebook is through the touchpad. Press down with three fingers on the touchpad to capture the entire screen, or swipe down with three fingers to select an area for screenshotting.
Chromebooks also come equipped with a built-in screenshot tool in the App Launcher. You can access this tool by clicking on the Launcher icon in the bottom-left corner of your screen and selecting “Screenshot.”
With these different methods, capturing screenshots on your Chromebook is quick and effortless!
Step-by-Step Guide for Using Keyboard Shortcuts to Take a Screenshot
Ever wondered how to capture your screen on a Chromebook with just a few keyboard strokes? Well, it’s easier than you think! You can quickly snap and save anything on your disk by mastering some simple shortcuts.
To start, press the “Ctrl” key along with the “Switch window” key (usually located at the top row of your keyboard). This will instantly take a screenshot of your entire screen.
If you only want to capture a specific area, add the “Shift” key to that combination. Once pressed, click and drag over the desired region – voilà! Your custom screenshot is ready to go.
Don’t forget about pasting it somewhere or saving it directly in your downloads folder for easy access later. With these quick steps, screenshotting becomes second nature on your trusty Chromebook.
Using the Touchpad to Take a Screenshot
The touchpad can be a handy tool when capturing your screen on a Chromebook. You can easily take a screenshot using simple touchpad gestures without remembering keyboard shortcuts.
To use the touchpad for screenshots, press down with three fingers simultaneously on the touchpad. This action will capture the entire screen and save it as an image in your downloads folder.
If you want to capture only a specific area of your screen, you can use two fingers and draw a box around the desired location on the touchpad. The Chromebook will then capture that selected region for you.
Using the touchpad for screenshots is intuitive and convenient, making it easy for users who prefer gestures over keyboard commands. Just swipe and click – it’s that simple!
Utilizing the Chromebook’s Built-in Screenshot Tool
Are you aware that your Chromebook comes with a built-in screenshot tool? Yes, it’s true! This nifty feature makes capturing screenshots a breeze. Utilizing the Chromebook’s native screenshot tool is simple and efficient.
To access this tool, press the “Ctrl” and “Show Windows” keys simultaneously. Your screen will dim momentarily, indicating that the screenshot has been taken. You can then find your screenshots in the Downloads folder.
The beauty of using this built-in tool is its convenience. It eliminates the need for third-party apps or software, streamlining the process. This tool has got you covered whether you’re capturing an image, webpage, or error message.
So, next time you need to capture something on your Chromebook screen quickly and effortlessly, remember to utilize the built-in screenshot tool at your disposal!
Tips and Tricks for Effective Screenshotting on a Chromebook
So, you’ve mastered the art of taking screenshots on your Chromebook. But let’s take it up a notch with some tips and tricks to elevate your screenshot game!
First, consider organizing your screenshots into folders for easy access and better organization. This way, you won’t have a cluttered desktop filled with countless images.
Another nifty trick is utilizing keyboard shortcuts for capturing the screen and quickly editing and saving the screenshot. Familiarize yourself with these shortcuts to streamline your workflow.
If you’re dealing with multiple windows open, try using the window selection feature when taking screenshots to capture only what you need without any distractions in the background.
Don’t forget about utilizing external tools or apps that offer more advanced editing options if you need to annotate or enhance your screenshots before sharing them.https://www.engadget.com/
Stay tuned for more pro tips on making the most out of screenshotting on your trusty Chromebook!
Conclusion:
Choosing the Best Method for Your Needs
After exploring the different methods of taking screenshots on a Chromebook, you now have various options based on your preferences and needs. Whether you prefer using keyboard shortcuts for quick and easy access, utilizing the touchpad for more precise selections, or relying on the built-in screenshot tool for added features, there is a method that suits you best.
Consider your workflow, frequency of taking screenshots, and comfort level with each method to determine which aligns most with your requirements. Experiment with the techniques discussed in this article to find the one that seamlessly integrates into your daily tasks. Also, Click
By mastering screenshotting on your Chromebook using these diverse methods, you can effortlessly enhance your productivity and communication by capturing critical information. So go ahead and start snapping those screenshots like a pro!